Boy oh boy oh boy oh boy! I feel a bit like I've been in a battle and came out limping. As I said to Harriet in a previous comment, sometimes, just sometimes I wish I was in a class room, with a teacher and fellow classmates who are also struggling to learn something new. It would be so nice to glance around the room to check what I am doing against what others are doing, to ask questions, to get it right the first time, *Sigh* but the classroom is in Colorado which is such a long way away.
I finished the top, but am unhappy with the quality of the work. And to top everything off, when I was prepping the pictures for the blog I noticed another error. Actually 2 errors. *Sigh* I'll fix it tomorrow. Funny, this isn't the first time I've missed seeing obvious mistakes until I look at a picture.

Can you see the dodgy blocks?
Side Setting Triangles
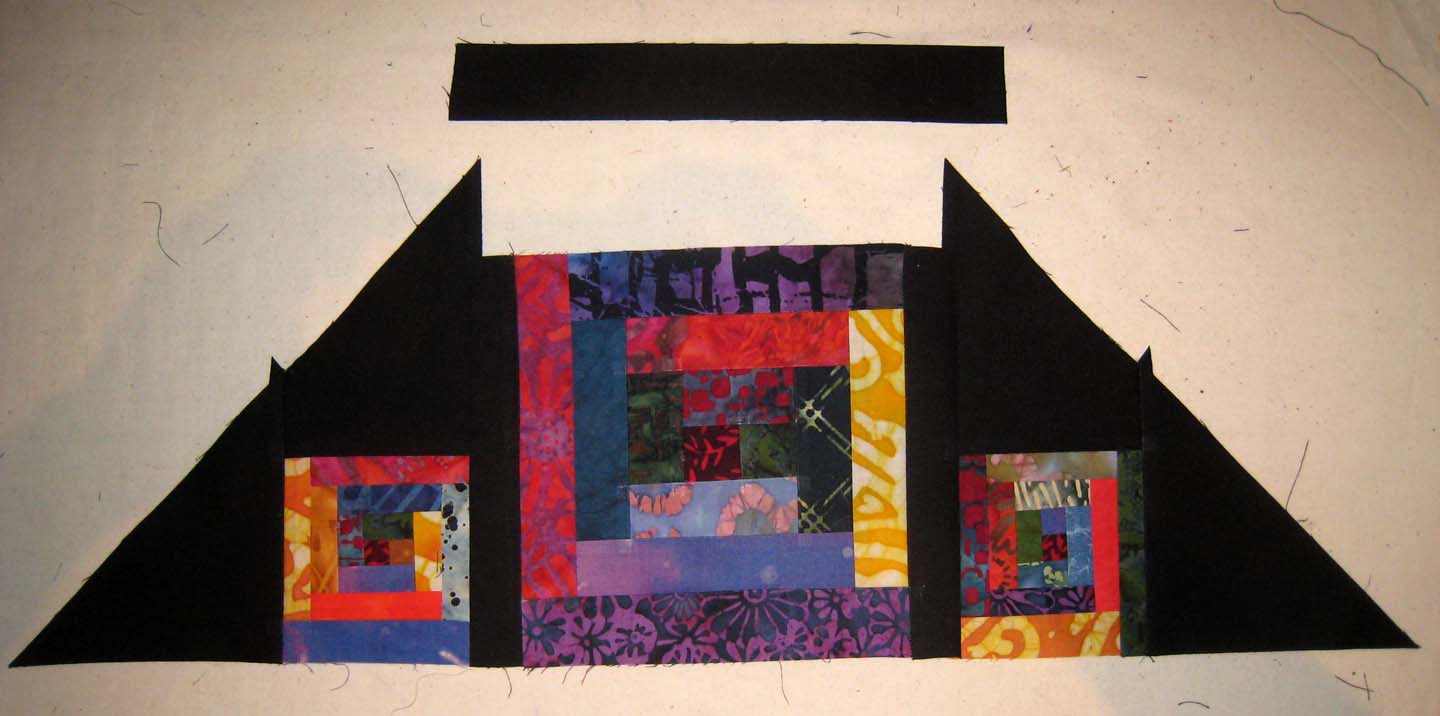
The side setting triangles, as you can see, have mini blocks placed within them. I kinda had a problem sorting out how to do this and finally got it right on the 3rd try. Eventually it was just easiest to pin them up on the design wall and spin the bits around until I found out how they fit. Once that was sorted, the sewing part was easy peasy and all 16 of them went together quickly

Sorting out the mini log side setting triangles

Cute!
SashingSo far, so good. Next, came the sashing and I had an issue with the cutting. I am getting somewhat confused on when to cut lengthways and when to cut across the width. I think I must have got it wrong here, as I followed the instructions, cutting lengthways (as I guessed). I was supposed to cut 9 strips from this piece, but I only managed 4 long pieces. I guess I was supposed to cut across the width in this instance. After this, because I'd changed the size of my quilt, I quit following the cutting instructions and just worked it out for myself - yes as usual I ended up with too much, but I did get the very long lengths I needed and avoided having to piece any of the sashing.
Everything got pinned up on the design wall. Nice idea, but tedious, as anytime I needed part of the top to work on, I had to un-pin, shift things around then re-pin again. All in all the design wall got pretty messy and it hard to see what was going on and how things were fitting together. Of course it all ended up on the floor, where it stayed.

Pinned to the wall (design curtain?)

On your knees - it's a design floor!
Construction
With the side setting triangles made and the sashing lengths cut, it was time to sew it all together. This is where I got into all sorts of trouble. First off, the short strips are sewn to the side of the blocks, which also sews all the rows together. No problem.
Next, the instructions say to sew the side setting triangles to the ends of the rows. Again, no problem. Now I am supposed to add the long sashing to the top of the row. OH.
I can't figure out how to do this
Here is the first row. The top sashing strip needs to be sewn from the beginning of one side sashing strip to the end of the other. I can't figure how to do that with the side triangles on there. My solution was to unpick the top and bottom halves of the side triangles, sew the sashing on, then re-sew the triangles back on.

I had to undo the triangles to get the sashing on

Then sew the triangles back on again
After a lot of unpicking and re-sewing (and a small amount of swearing) I eventually got the sashings sewn on. Obviously I got this part very wrong and Carrie has kindly offered to walk me through the process so I can see how to do it correctly.
Getting the sashing sewn on is only part of the process. While sewing it on, the blocks above and below the sashing need to match up. First I thought 'yay - no seam butting' but butting seams is simple compared to this.
Harriet suggests marking all the long sashing strips where the blocks and side sashings all start and finish, so the sashings will all match up. Ok, sounds good to me and I did this on the first strip, using a white quilting pencil. The sewing went well and the sashings matched nicely, so I headed to the ironing table. STOP. Doesn't heat set pen markings permanently? Hmmm. I removed the marks before pressing (whew) and decided to pin mark instead. Marking with pins works, but not nearly as well or as precisely.
 Pin Marking
As I pressed open each seam, I could see how far off the matching was - it was really quite disheartening. I unpicked about three of the long sashings, but the re-sewing was really no better, in fact it got worse as the fabric was 'overhandled', fraying and hard to re-sew an accurate 1/4" seam. I did however, switch from using the Bernina Record to using the Pfaff and I must say the IDT really did make a bit of difference, stopping the fabric layers from moving about too much and getting too far out of whack.
Oh - I also had to throw out a brand new cone of thread. Never again will I buy Signature thread on a cone. It fluffs, it shreds, it has large knots in it (I kid you not)! I've had trouble with this thread before, but persevered as it's the only cotton thread I can buy locally on a large cone - and I use a lot of thread. It's not cheap either, at $25 a pop, so it's quite devastating to chuck out 3 cones of the stuff (yes 3 - 1 black, 1 grey & 1 cream).
On top of this, I also had problems at the ironing board. When I pressed over a seam intersection, I got a little shiny mark. Turing the heat down on the iron didn't help, starch seemed to make it worse and using a pressing cloth was a bit impractical. So another thing to have to live with. I am not loving this quilt at all!
Now here I am and my quilt has side triangle placement errors, mis-matched sashing, wonky 1/4" seams and little shiny bits from the pressing. You can see these in the photo below. All that's left to do is the corner triangles.

Madam, that's a very large hat you're wearing!
What's going on here? Frankly I don't know and at this point, almost don't care! In previous projects this corner piece has been a tad too small. This time it's huge! At least I can fix this bit.

I marked trimming lines for the corner triangles before sandwiching the quilt.
Making a Quilt Sandwich
I wanted this quilt done and dusted asap, so as soon as the construction was done, I prepped it for quilting. Now I now longer have the large table for basting, I thought I'd show how I baste on a narrow table top - the instructions for doing this come (with modifications) from Harriet Hargrave's book Heirloom Machine Quilting.
First the backing is pressed, trued and well starched. I've marked the centre of the table with a Sharpie (don't panic, it's an old table from the shed, not the dining room table)! and pin-marked the centres of the backing, batting and top.

Pin mark the centres

Align the pin with the mark on the table (use a toothpick if the fabric covers the marks), smooth the fabric taut and secure with clamps

Next the batting is aligned, smoothed and clamped - I'm using black Hobbs 80/20 cotton for this quilt

Now the freshly pressed & starched top is aligned, smoothed and clamped taut

Check there is plenty of extra batting and backing all the way around the top (I always seem to leave too much)!

Start pinning from the centre, working out towards the edge of the table

When the centre is finished, un-clamp the layers and push them over to the side, re-smooth, re-clamp and continue pinning. Of course I ran out of pins - no matter how many I have, it's never enough!

When it's done, flip the sandwich over and check the back for pleats, wrinkles and puckers

So there it is..... all ready for ditch stitching and quilting. Well, not quite, remember those mistakes I saw in the photo? It seems I'm not going to be quilting tomorrow after all. Instead I'll be un-pinning the sandwich, un-picking the sashing, fixing the errors then re-sandwiching again. I don't think I'll be in the mood for quilting after that.
Now where's that bottle of red?
It looks great. Don't worry about the mistakes. Every quilt needs a humility block. Where did you get the safety pin covers from?
ReplyDeleteBless your heart. It does look great, in that first photo, the one you said you couldn't wonky blocks until you pinned it up, I can't tell what's wonky!
ReplyDeleteNeither can I! Start quliting!
ReplyDeleteJudy B
I can't see any mistakes either. It's been an interesting learning curve for you, it looks fantastic so quilt it and show it off with pride :D!
ReplyDeleteLook at the top right and bottom left blocks - there is no sashing between the large and mini blocks. The worse part is I have no idea how that happened.
ReplyDeleteIf it was just one of my practice quilts I'd chalk it up to experience and move on, but I'm gifting this one. I'd be too embarrassed to give it to Julie with mistakes like that!
Quiltjane - the safety pin covers are great. I got some from Harriet, some from Punch with Judy at the Melbourne Craft Fair and some from Stephanie Newman here in Hobart. They are quite difficult to come by, so if I see any, I grab them.
I think your quilt looks great and if your friend is happy I'd leave it alone. Maybe if you were keeping it and it was on your bed every night reminding you that you weren't 100% happy it would be different.
ReplyDeleteI think perfection is over-rated anyway.
You quilt is lovely, finish it and give it away knowing that it is a wonderful gift.
Lesley, I think you will learn more by moving on and making the next quilt than unpicking and re-doing. Your friend will love the fact you made her a quilt, and if she is your friend she won't mind any "learning opportunities" in the quilt as you are a new quilter, and no-one is perfect. She will be glad you gave it to her- it is a very pretty quilt! If she's not, you can bring it to me to find a home, lol!
ReplyDeleteIf I were you where you are now, I would quilt it, learn from your glitch for the next time around and move on to the next quilt with enthusiasm. It doesn't sound like you are having much fun right now and we can't have that-quilting is fun, right?
Hi Lesley
ReplyDeleteI love the colours. Its such a happy quilt. I know you have struggled with this one but you learn from the mistakes. So enjoy, hows the crazy patch coming along?
Thanks Melody, Julie loves the quilt and is happy either way, fixed or left as is. It's bound for the back of her couch.
ReplyDeleteStephanie - I actually fixed it today and feel better for it. I also found out why and how I went wrong which is even worthier experience. It scares me though that such a simple quilt could cause me problems. I hope the next ones will be kinder!
Hi Ali - after fixing the quilt, instead of quilting it like I planned, I made a crazy patch instead. It was a perfect diversion!
That's Great Lesley can't wait to see it
ReplyDeleteMistakes what mistakes - looks great! Wonderful quilt.
ReplyDelete