Quilter's Academy - Volume 2 - Sophomore Year

Vol 3 - Junior Year


Wednesday, September 29, 2010

Vol 2 - Project 5 - Cabin in the Cotton - the saga continues

Hi everyone.

I ended up making the fix to this quilt - mainly for 2 reasons

1 - the inch lost from the missing sashing meant my top wasn't square - either I needed to fix it or trim the rest of the quilt back.

2 - the error really bothered me!


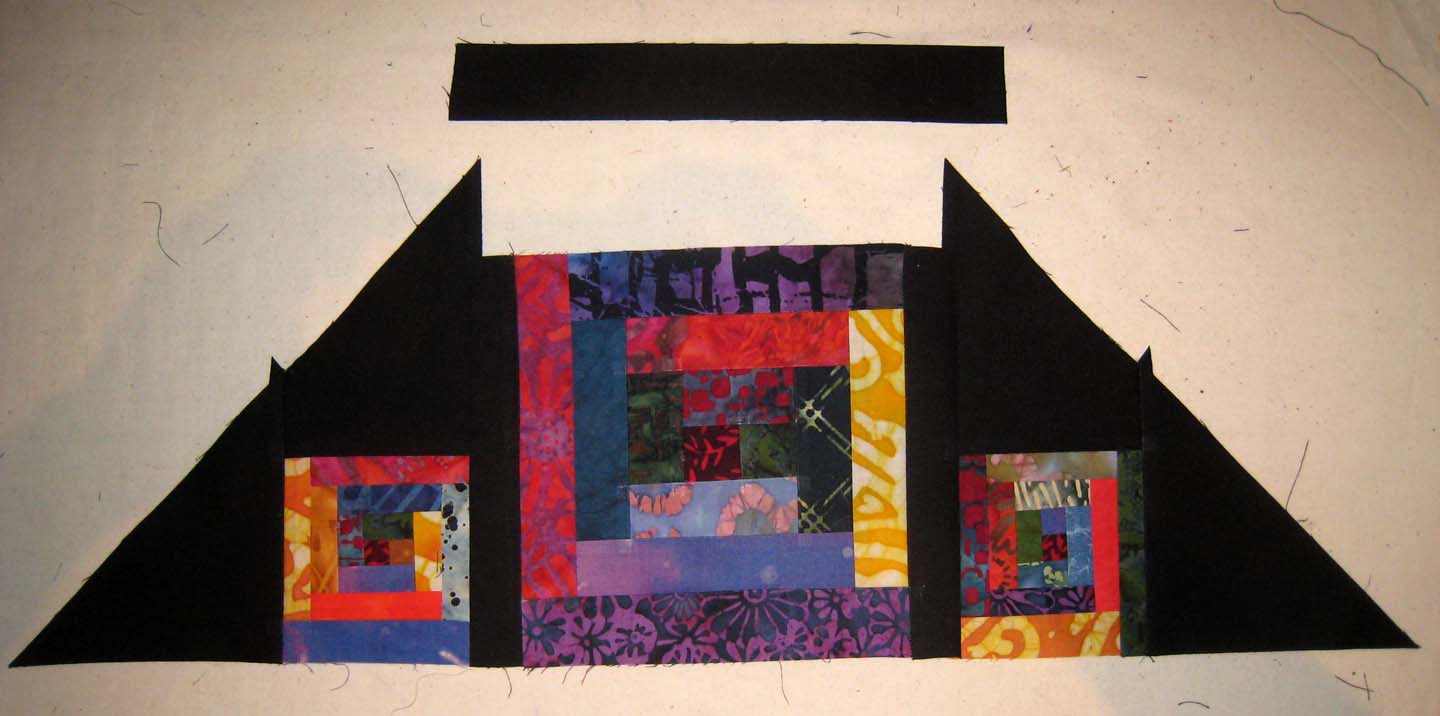
The top edges on 2 sides are an inch too narrow

 Julie loves the quilt and was happy for me to either fix it or leave it alone - she just wants to get it home!  In the overall scheme of things, I spent roughly 2 weeks putting this top together and I hope this quilt is going to be around for a long time to come, so another couple of hours work to fix it is worth the effort.

I will admit to some cheating though.  I didn't after all pull the whole thing apart, but simply took off the offending triangles and pieced in the extra lengths of sashing.  A shame really as I went to all sorts of trouble to get the long sashings to the right length without having to piece them!


Pieced sashing

Also, this is a very simple quilt and the fact that I had problems with it really caused me to think about where I'm going with all this.  The quilts in this series are going to get more and more complicated and by book 6 they are going to be mind-blowingly difficult (for me) to make.  If I want to continue in my quest to become a competent quilt-maker I need to understand the basics.  So I'm going to make this quilt again and do it correctly.  Carrie has emailed me pointing out where I went wrong


 If you remember this picture from the last blog post - you'll see where I got confused.  With the side triangles on, I couldn't get the top sashing on.  Carrie corrected me on this - those points on the side triangles need to be trimmed off!  Dahhh simple really, and at this point in my 'lessons' I should have realised this.

The re-make of this quilt will be the as is, with no changes in size to the pattern.  The only difference will be the amount of fabrics.  There is a quilting store in Hobart with a great range of 1930's prints but they sell them only by the metre or as fat 8th's, as these prints are popular for scrappy quilts.  So I'll be using 24 fat 8th's instead of 12 FQ's for the fabrics.  Hopefully this time I'll get it right!

FRONT LOADER WASHING
Because I made Julie's quilt from 90% batik fabrics, and according to the book, batiks are the most likely to bleed in the wash (along with hand dyes and deep dark colours, which make up the other 10% of fabrics in this quilt), I made an extra block to test for colour runs which was also useful for playing with quilting designs.  I never pre-wash my quilting fabrics, so a test wash was essential.

I have a front loading washing machine, which means I can't use most of the products or techniques recommended for quilt washing.  My machine is fairly old and doesn't have a soak cycle either.  In fact the machine uses very little water and soap, the quilt isn't submerged when being washed, but gently sloshes around in there getting very wet but always moving.

The way I wash my finished quilts is to use a gentle cold water only cycle and a tiny bit of washing powder.  If I didn't use washing powder I'd worry about the blue marking lines not being completely removed and returning later as brown marks.  I can't use the gentle soaps and pastes recommended for quilt washing either, as my machine requires a special low-sudsing powder.  Pre-soaking in the sink then moving to the machine is a concern, as a sopping wet quilt is not something which likes to be handled too much.  So far I've had no problems with washing any of my quilts.  I have, however stopped hovering around the machine, looking in the little window checking for brightly coloured water!  If the colours did run there would be nothing I could do anyway - I can't get the quilt out of there until it's done.

So I played with some quilting on my sample and threw it in the washing machine with some natural coloured calico and a Colour Catcher sheet.  I also had a packet of colour run remover on hand!


The fabrics didn't bleed at all.  The calico has no hint of any colour and even the colour catcher only turned a light grey rather than a rainbow of colours.  Call me surprised (but pleased).

I don't like the quilting design I chose to test.  The fabrics and batting are both cottons and have shrunk considerably, which I normally prefer, but too much texture doesn't suit this quilt.  Nor do I like the variegated thread.  For the quilting, Julie and I have chosen to do simple scallops (which Julie calls rainbows), use invisible nylon on top and the variegated thread in the bottom, which should show up well on the black batting.

Off to the sewing room for more fabric cutting and a new Cabin in the Cotton quilt.


Saturday, September 25, 2010

Vol 2 - Project 5 - Cabin in the Cotton - Sashing and Construction

Boy oh boy oh boy oh boy!  I feel a bit like I've been in a battle and came out limping.  As I said to Harriet in a previous comment, sometimes, just sometimes I wish I was in a class room, with a teacher and fellow classmates who are also struggling to learn something new.  It would be so nice to glance around the room to check what I am doing against what others are doing, to ask questions, to get it right the first time,  *Sigh* but the classroom is in Colorado which is such a long way away.

I finished the top, but am unhappy with the quality of the work.  And to top everything off, when I was prepping the pictures for the blog I noticed another error.  Actually 2 errors.  *Sigh*  I'll fix it tomorrow.  Funny, this isn't the first time I've missed seeing obvious mistakes until I look at a picture.

Can you see the dodgy blocks?

Side Setting Triangles
The side setting triangles, as you can see, have mini blocks placed within them.  I kinda had a problem sorting out how to do this and finally got it right on the 3rd try.  Eventually it was just easiest to pin them up on the design wall and spin the bits around until I found out how they fit. Once that was sorted, the sewing part was easy peasy and all 16 of them went together quickly
Sorting out the mini log side setting triangles

Cute!
Sashing
So far, so good.  Next, came the sashing and I had an issue with the cutting.  I am getting somewhat confused on when to cut lengthways and when to cut across the width.  I think I must have got it wrong here, as I followed the instructions, cutting lengthways (as I guessed).  I was supposed to cut 9 strips from this piece, but I only managed 4 long pieces.  I guess I was supposed to cut across the width in this instance.  After this, because I'd changed the size of my quilt, I quit following the cutting instructions and just worked it out for myself - yes as usual I ended up with too much, but I did get the very long lengths I needed and avoided having to piece any of the sashing.

Everything got pinned up on the design wall.  Nice idea, but tedious, as anytime I needed part of the top to work on, I had to un-pin, shift things around then re-pin again.  All in all the design wall got pretty messy and it hard to see what was going on and how things were fitting together.  Of course it all ended up on the floor, where it stayed.

Pinned to the wall (design curtain?)

On your knees - it's a design floor!
Construction
With the side setting triangles made and the sashing lengths cut, it was time to sew it all together.  This is where I got into all sorts of trouble.  First off, the short strips are sewn to the side of the blocks, which also sews all the rows together.  No problem. 

Next, the instructions say to sew the side setting triangles to the ends of the rows.  Again, no problem.  Now I am supposed to add the long sashing to the top of the row.  OH.

I can't figure out how to do this

Here is the first row.  The top sashing strip needs to be sewn from the beginning of one side sashing strip to the end of the other.  I can't figure how to do that with the side triangles on there.  My solution was to unpick the top and bottom halves of the side triangles, sew the sashing on, then re-sew the triangles back on.

I had to undo the triangles to get the sashing on

Then sew the triangles back on again

After a lot of unpicking and re-sewing (and a small amount of swearing) I eventually got the sashings sewn on.  Obviously I got this part very wrong and Carrie has kindly offered to walk me through the process so I can see how to do it correctly.

Getting the sashing sewn on is only part of the process.  While sewing it on, the blocks above and below the sashing need to match up.  First I thought 'yay - no seam butting' but butting seams is simple compared to this. 

Harriet suggests marking all the long sashing strips where the blocks and side sashings all start and finish, so the sashings will all match up.  Ok, sounds good to me and I did this on the first strip, using a white quilting pencil.  The sewing went well and the sashings matched nicely, so I headed to the ironing table.  STOP.  Doesn't heat set pen markings permanently?  Hmmm.  I removed the marks before pressing (whew) and decided to pin mark instead.  Marking with pins works, but not nearly as well or as precisely. 

Pin Marking


As I pressed open each seam, I could see how far off the matching was - it was really quite disheartening.  I unpicked about three of the long sashings, but the re-sewing was really no better, in fact it got worse as the fabric was 'overhandled', fraying and hard to re-sew an accurate 1/4" seam.  I did however, switch from using the Bernina Record to using the Pfaff and I must say the IDT really did make a bit of difference, stopping the fabric layers from moving about too much and getting too far out of whack.

Oh - I also had to throw out a brand new cone of thread.  Never again will I buy Signature thread on a cone.  It fluffs, it shreds, it has large knots in it (I kid you not)!  I've had trouble with this thread before, but persevered as it's the only cotton thread I can buy locally on a large cone - and I use a lot of thread.  It's not cheap either, at $25 a pop, so it's quite devastating to chuck out 3 cones of the stuff (yes 3 - 1 black, 1 grey & 1 cream). 

On top of this, I also had problems at the ironing board.  When I pressed over a seam intersection, I got a little shiny mark.  Turing the heat down on the iron didn't help, starch seemed to make it worse and using a pressing cloth was a bit impractical.  So another thing to have to live with.  I am not loving this quilt at all!

Now here I am and my quilt has side triangle placement errors, mis-matched sashing, wonky 1/4" seams and little shiny bits from the pressing.  You can see these in the photo below. All that's left to do is the corner triangles.

Madam, that's a very large hat you're wearing!

What's going on here? Frankly I don't know and at this point, almost don't care!  In previous projects this corner piece has been a tad too small.  This time it's huge!  At least I can fix this bit.

I marked trimming lines for the corner triangles before sandwiching the quilt.

Making a Quilt Sandwich
I wanted this quilt done and dusted asap, so as soon as the construction was done, I prepped it for quilting.  Now I now longer have the large table for basting, I thought I'd show how I baste on a narrow table top - the instructions for doing this come (with modifications) from Harriet Hargrave's book Heirloom Machine Quilting.

First the backing is pressed, trued and well starched.  I've marked the centre of the table with a Sharpie (don't panic, it's an old table from the shed, not the dining room table)! and pin-marked the centres of the backing, batting and top.

Pin mark the centres

Align the pin with the mark on the table (use a toothpick if the fabric covers the marks), smooth the fabric taut and secure with clamps

Next the batting is aligned, smoothed and clamped - I'm using black Hobbs 80/20 cotton  for this quilt

Now the freshly pressed & starched top is aligned, smoothed and clamped taut

Check there is plenty of extra batting and backing all the way around the top (I always seem to leave too much)!

Start pinning from the centre, working out towards the edge of the table
When the centre is finished, un-clamp the layers and push them over to the side, re-smooth, re-clamp and continue pinning.  Of course I ran out of pins - no matter how many I have, it's never enough!

When it's done, flip the sandwich over and check the back for pleats, wrinkles and puckers


So there it is..... all ready for ditch stitching and quilting.   Well, not quite, remember those mistakes I saw in the photo?  It seems I'm not going to be quilting tomorrow after all.  Instead I'll be un-pinning the sandwich, un-picking the sashing, fixing the errors then re-sandwiching again.  I don't think I'll be in the mood for quilting after that.

Now where's that bottle of red?


Tuesday, September 21, 2010

Vol 2 - Project 5 - Cabin in the Cotton - Making the Blocks

26 fabrics - 24 log, 1 centre, 1 sashing - 40 large blocks, 16 mini blocks - complete!

To make the quilt square, I did the math then chucked it all away and decided instead to simply double the size, and double the number of fabrics.  This meant I needed to add another 6 FQ's to Julie's selection of 18 fabrics

Spoiled for choice

Sewing the blocks was super easy (once you manage to figure out the correct way to align the logs)

Oops - wrong way round - where's that un-picker?

Random log picking.  It was all pieced completely randomly, honest!  Well, almost.  When a block was mostly all green or all purple, I cheated, if there were 2 fabrics the same next to each other I cheated, but mostly they were put together by pulling random strips out of a bag.

Too many strips!

Although I doubled the amount of fabrics, I cut the amount of strips per FQ as required in the pattern.  I ended up with far too many!  There was some confusion also about which way to cut the strips, which I think added to my extra large collection.

Measure against the seamlines...............

............ then trim back to size

Harriet, in her wisdom, has you cut the strips 1/8" wider than required, then trim them back to size after piecing.  This method gives you an extremely accurate sized block.  The chain style piecing is super fast but the trimming is oh so tedious!  Sew..press..trim..repeat..repeat..repeat...........................

Halfway through


After each compete round, I checked the block size against a template

I got there in the end, but have a look at the leftovers...........

I have enough fabric & strips left over to make another quilt!

Ok, so my maths isn't great, which is not good news as now I have to work out the sashing lengths.  Wish me luck!


Sunday, September 12, 2010

Vol 2 - Project 5 - Cabin in the Cotton - Julie's Quilt

Hello again.  I'm back from the mainland after doing the grandma thing, helping out the new Mum & Dad.  Milly is lovely and I know she'll be much changed when I next see her, which won't be until early next year.

Work has begun on the next quilt in the book - a log cabin design.


Its a very pretty quilt and I really like the 1930's prints used here.  This quilt is a lesson in adding sashing between the blocks - something not tackled yet on any of the previous projects.

As it's my intention to make all the quilts from all 6 of the books (notice the word "intention"), I'm going to end up with a load of quilts, far more than I can possibly use.  So I've asked a few friends to choose a design from Vol 2 and to choose fabrics from my stash and I will gift them the quilt when it's all done.  Julie has chosen this one.

FABRIC SELECTION
I have a nice little selection of 1930's prints but Julie decided these were not her style.  She wanted something a bit brighter and definitely not a white background.  This is what she chose.........


Julie's Fabrics

Most of the fabrics are batiks, with a few hand-dyes thrown in.  We pondered the sashing material for a while, trying out creams, yellows, greys and tans, but as soon as I threw down the black, she was sold!  The brights really glow against the dark background - I think these fabrics are going to look fabulous.

This quilt is made from Fat Quarters and the pattern calls for 13 different fabrics - you may notice Julie's selection has 19 fabrics  ???  There are 2 reasons for this, the first is that we want to make the quilt larger.  It's crib size but a lap quilt would be more useful, so I'm going to add 4 extra blocks and make the quilt square.  The second reason is that Julie had such a hard time culling the selection!  I pulled out all the batik FQ's I had in my stash, plus a few others to synchronise the colours and Julie was supposed to choose from these.  She managed to reject only 1 FQ - lol!

I think the hardest part for me in putting this quilt together will be the random selection.  The idea is to cut all the strips, put them in a box and pull them out at random - whatever comes out of the box is the next log to be sewn.  The control freak in me is going to have a problem with this!  For this reason, Julie had to make sure all the fabrics would work together, regardless of which colour is put next to another.

FABRIC CALCULATIONS
Because I want to change the size of this quilt, I have to do some extra work.  Harriet very kindly explains exactly how many strips to cut for each of the patterns, but this is supposed to be a tutorial, not a pattern book, so all the formulas for doing the calculations are also explained and included.  To work out how many strips to cut from each of the FQ's I needed to go back to Vol 1 and refer to the very handy chart which details working out yardage for log cabin quilts.

Even with the chart, I needed to do some adjustments i.e. working with FQ's instead of yardage and calculating in the 4 extra blocks and 5 extra fabrics.  I'm never very trusting of my mathematical abilities and the whole project could go horribly wrong - but the only real way to learn is to do, so I'm giving it a shot.

ONE OTHER THING..........
Milly enjoying her new quilt and her new Grandma!