Quilter's Academy - Volume 2 - Sophomore Year

Vol 3 - Junior Year


Sunday, December 30, 2012

Vol 2 - Sophomore Final

Yes, it's time for the Final Exam.  If you don't already know how this works, a quick explanation.

For the very last project in the book, Harriet and Carrie set a Final Exam. 

This is what you get.........

A photograph of the finished quilt
An illustration of a single block
An illustration of an internal frame block
An illustration of an internal frame corner block
A series of questions such as.....
How many unit # are in one block?
How many are needed for all 5 blocks?
How many inches of strip sets are needed to accommodate the number of units needed?

That is all.

What you don't get..........

A grid size
No fabric quantities
No cutting instructions
No pressing directions
No construction instructions
No assembly instructions

Phew - tough exam? You bet!

Here is a pic of the Sophomore Exam Quilt - Ice Crystals

 
Designed by Carrie Hargrave, its a variation of Bygone Surrounded
 

 As promised, I worked on this today and have finished one block.
 
My Test Block for Ice Crystals
 
 
Now that all seems great - I made the exam block so now all I need to do is make another 4 of these, add the internal frame, side setting triangles, borders and the top is done.  There is however, a problem.
 
I did not make this block the way Harriet intended.  I didn't sit down with a calculator or graph paper or a spreadsheet and figure it all out first.  Uh- uh no.  I can't seem to be able to work that way.  It makes my brain hurt.
 
What I did was set my grid size first (I chose a 1 inch grid) and made up the units on the fly, calculating the measurements as I went.  I wrote my measurements and quantities on the worksheet as I made the units up.
 
This method works for me, and that's fine I suppose at this level, but as the lessons progress to more complex blocks, I think I'm going to find myself in a bit of trouble.
 
The block and sashing on a 1 inch grid is huge - finishing at 21.5 inches.  This was unexpected and after making just one block I find I'm short on the print fabric.  I used a fat quarter and I have only half of this left.  My options now are to go back to the shop and buy the correct yardage (if they have any left).  Or I could use a different fat quarter print for each block (an interesting idea I rather like) because all the black on white prints in my stash are fat quarter cuts.  Or I could simply discard this block and start from scratch using a new set of fabrics.  Also not a bad idea as it's good practice I think to make and keep a test block from all quilt projects (something I haven't been doing - oops).
 
I'll sleep on it and decide tomorrow how to progress this.............
 
Cheers :)


Saturday, December 29, 2012

A Couple of Non Harriet Projects

Phew is it really so long since my last post?  I've had a bit of a sewing hiatus but am ready to go again.

I decided to ease myself back into quilting mode by doing some easy quilt techniques, before heading back to Quilters Academy and all that wonderful precision piecing!

ONE BLOCK WONDER
Jenny and Pam from my quilting group each decided to make a One Block Wonder quilt, a technique taught by Maxine Rosenthal.  I had purchased some fabric to make one myself some time ago and was finally inspired to give it a go.

This is my fabric - shades of beige, cream and grey

Wild Horses by Henry Alexander (I think). 
 
I started using one of the designs in Maxine's book, but the project ended up taking on a life of it's own ......
 
I've called it Hip to be Square
 
I sort of got carried away by the cubes....... the original design didn't have any at all.  Some are bold but there are hidden ones as well.
 
Hidden cubes
 
I have no idea how to quilt this thing. All the seams are pressed open, so no ditch and because the technique insists on keeping all the points on, each kaleidoscope has a lump in the centre where all those points meet. 
 
Kaleidoscope back
 
To add to the problem, I decided to partially piece the backing as well, using a slab of the original fabric and my leftover hexagons and experimental cubes.  For now, it's in the Too Hard Basket.
 
Experimental cubes ended up on the back ... lol 

FRENCH BRAID

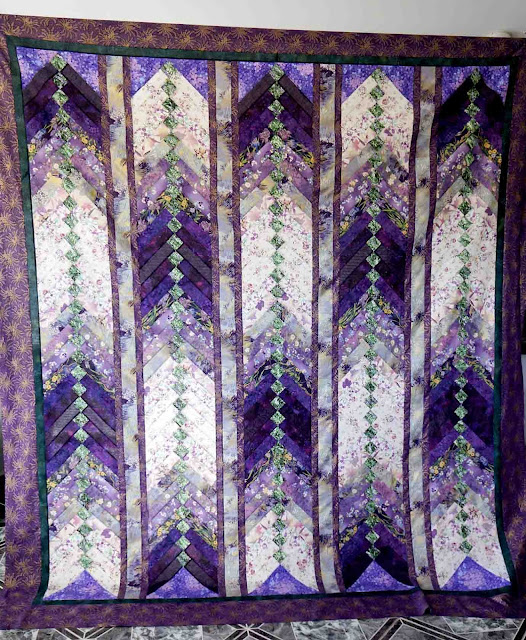
One project I'd wanted to do for some time was another french braid, as my first one was unsuccessful.  Armed with Jane Hardy Miller's book, I got stuck in.  Honestly, the hardest part to making one of these is selecting the fabrics.  How embarrassing to have failed at making one of these, they are super quick and easy.  This one is huge, easily the biggest quilt I've made so far.
 
 
I've called this one Purple Rain 
 

QUILTERS ACADEMY BOOK 3

Here I was getting organised to start QA Vol 3 in the New Year when I realised I still have one left to do from Vol 2.  Yikes....it's the Final Exam quilt. It's my next project, promise.  :)


Saturday, July 14, 2012

Vol 2 - Project 13 - Revealed


The top is finished - I wonder if anyone figured out how it might look?  Anyway here is the project all assembled.......


Pretty huh

I had absolutely no issues at all putting this top together.  The instructions for this project are minimal, with pretty much only cutting directions given, the rest you need to figure out for yourself.  Even which direction to press the seams, something which has always confused me. Over the course of the 2 books, Harriet has taught me how to read a block and figure out how to make it.

Using all of Harriet's techniques - paying attention to accuracy when cutting and piecing, careful pressing, fanning the seams, trimming the blocks - it all sounds like a lot of extra work and yes, it takes longer, but the results are worth it.  Everything fitted, the points match, the top is square and flat. 

Yippee! 

Harriet's version of this quilt has a framing border of the dark fabric and small border and binding in the light fabric.  It looks great, but alas I have no fabric left for either borders or binding. 

I played around with borders of different colours and eventually decided this top doesn't need any borders at all. I've made the side setting triangles larger than required, so I have about an inch and a half extra width of the light paisley teal. I think this is enough.

Harriet's quilt is below.

Similar colours for both quilts.  If this was to be my quilt I would have chosen very different colours, but the teals really are very pretty and I'm happy with how it came together and turned out. 

I still have a problem with selecting a binding for mine - I'm not really happy about introducing another colour - maybe I'll use cream as I have lots of that left over.

QUILTING

I've recently completed a Quilting Masterclass with Deborah Louie http://www.deborahlouie.com.au/
where, amongst other things, I learned Trapunto quilting.  I'm very keen to have a go at this on a real quilt and this one seems like an excellent candidate, with all that white space.  I'd use wool/poly batting and lots of stippling to really help the design pop out.

I selected a couple of simple stencils which I thought could be good for beginner trapunto...


Then, looking at the photo of the quilt, I could see circles, or spirals - like a ripple moving out from the centre of the blocks.  Hmmmm.

You may remember Project 13 from Vol 1 where I did circular quilting on a scrappy quilt with a cotton batting.  I love the texture the circles gave to the quilt and now I'm thinking about doing the same quilting on this new top to get a kind of ripples effect ..........

Project 13 Vol 1 - circular quilting

I'm a bit torn now on how to quilt this - any suggestions would be welcome!


Wednesday, July 11, 2012

Vol 2 - Project 13 - 4's and 9's with Internal Frame

This project, with the uninspiring name (sorry Harriet) is the last one before The Final, where I sit my Vol 2 exam.

I'm going to do this post a little differently and not show you the design up front.  The quilt is made up of 6 different blocks.............


The clever quilters out there will be able to see ways to put these blocks together to form a traditional style quilt.  The blocks are all set on point and the design incorporates an internal frame and side setting triangles.

This quilt is being made for Karen, who wanted teal and cream coloured fabrics.  Karen picked out her fabrics months ago but I've not seen her for ages and had forgotten which ones she chose.  I forged ahead anyway after selecting a dark green/teal and a teal/cream paisley for the main design and a cream for the background.

All the blocks have been made up and are sitting up on my design wall ready to be sewn together.  Looking at it, it's going to be a very pretty quilt.


Tuesday, April 17, 2012

Australasian Quilters Convention 2012

I'm back from AQC where I enjoyed alternate exhausting rounds of quilts, classes, functions and shopping.  Phew!

Although I've visited AQC in the past as a guest, this year was my first time as a delegate.  I did 3 classes over 4 days as well as attending a cocktail party, lecture, gala dinner and managed a bit of shopping as well.

Vikki Pignatelli - Crazy about Curves
This was my first class, which went over 2 days.  I was expecting to learn traditional curved piecing, you know with the pins and the easing etc.  I don't know why I thought this, as obviously I didn't read the class blurb very well, because that is the exact opposite of what Vikki teaches.

Vikki teaches a free form style of curved piecing, stress free, error free where any mistake can be fixed and the results are simply stunning.

Vikki Pignatelli helps outs some of the students.....

Vikki is an extraordinary teacher - infinitely patient and supremely talented.  I will admit to finding parts of the technique challenging, (folding freezer paper to a smooth curve) only then to find that fixing errors is extremely simple. 

The students produced a wide variety of work
You can get a close look at Vikki Pignatelli's work on her website http://www.vikkipignatelli.com/default.htm Although I did struggle a little in the close confines of the class, I purchased Vikki's book so I can explore her method in more relaxed surroundings at home.

Machine Applique Techniques with Deborah Louie
In this one day class, Deb managed to thoroughly cover several techniques - invisible applique, curved applique, free motion raw edge applique, blanket stitch applique, and using decorative machine stitches.  Is there nothing this girl doesn't know about quilting?  You can read more about Deborah Louie here on her blog - http://deblouie.blogspot.com.au/ .

Deb shows us how it's done........

happy students......

I actually finished a workshop piece....!


The generous and talented Deborah Louie

See that gorgeous quilt Deb is standing next to?  She gave all the students a free copy of the pattern as well as full size pattern for another quilt.  I love the blue/black/yellow colourway - I'm really tempted to make this quilt - love it!

At the end of June I have booked into a 3 day Free Motion Quilting Masterclass with Deborah when she comes down to Tasmania.  I expect to work hard and get fantastic results for my efforts.

William de Morgan with Michele Hill
My third class was another applique lesson, this time with Michele Hill.  I adore Michele's William Morris patterns and have already started on another piece from her book.  I didn't really need to take a class as I already understand the technique, but there is something to be said for learning direct from the author.


Tuesday, April 10, 2012

My first Retreat! - A workshop with Marlene King

A couple of weeks ago I was privileged to attend a workshop with the multi-talented, multi award-winning textile artist and quilter Marlene King.  You can see some of Marlene's extraordinary work on her website here - http://www.thefabricpalette.com/.

Marlene came out of retirement to teach this workshop, and even better, there were only 2 students - myself and my friend Diana Eaton.  The retreat was held over 3 days at Bengeo Retreat in beautiful Deloraine in northern Tasmania.

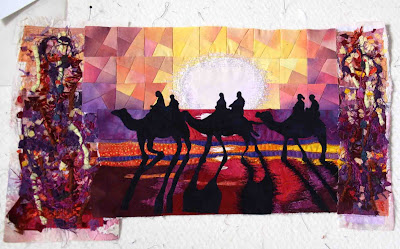
The subject of the workshop was to be landscapes.  Usually Marlene sets the project from which to learn the techniques, but this time we were asked to bring a photo of our own to work from.  I chose a picture of myself and hubby riding a camel along Broom's Cable Beach at sunset.  How gorgeous are those colours?

That's me and John on the middle camel

Diana and I were delighted when Marlene decided to hang up a different quilt each day - to inspire us and to point out different techniques she had used.  A very generous teacher, Marlene also said she would be happy to teach us any of the techniques we wanted to learn.

Marlene and Travels

The quilt Marlene is standing next to (and was hanging right next to me all day - that's my sewing machine right there) is a multi-award winning quilt named Travels, which has won the Tasmanian Best of Show, the Australian Quilt Convention Melbourne National, and most recently, second place Innovative at the World Quilt Show XV.  Phew!

My favourite of the 3 was this one -
How beautiful are these quilts?


Day 1 - bobbin work, background piecing and making fern leaves

Day 2 - design

Diana gets expert advice

Fabric selection - I brought heaps cause you never know............

By the end of Day 2 I was finally getting somewhere

Day 3 - Piecing....

Quilting
Thread painting
Applique

Ok, this is as far as I've got.  There is still thread painting to finish and I need to decide on a border, or extending the piecing or maybe something entirely different........

Using a technique by Caroline Sharkey, I made 'fabric' from scraps and bits and pieces to add to the edges of this piece. 

but haven't decided whether to use them or not.  I do rather like the effect though......


Then I have to learn how to make a faced edging.

Anyway, that's what I've been up to.  Tomorrow I'm off again, this time to do 3 workshops over 4 days at the Australian Quilt Convention where I'm booked to learn Curved piecing with Vikki Pignatelli, Applique Techniques with Deborah Louie and William Morris applique with Michele Hill.  Whoopee!


Saturday, February 25, 2012

Vol 2 - Project 11 - Star Chain

Hi fellow quilty people and thank you to those who left comments on my last posting - it's all really encouraging.

This next project introduces internal frames - here's Harriet's quilt............
Only 2 fabrics in this quilt - but I couldn't resist adding a 3rd - so I've made this with good quality black quilters muslin and 2 green hand-dyes.

Here's mine laid out, unsewn without borders..........

It's nice huh?

Yes it's a lovely design with pretty blocks and a nice layout.  Herein lies my problem...it's nice and I'm getting a little bored with nice so I decided to jazz it up with interesting borders.  But more of that later... there seems to be some issues with this quilt top which I want to talk about first.

THREE BLOCKS
There are 3 blocks which make up this top - one for the main body, one for the internal frame and one for the corners.  All are easy to do ....... check them out.
Main Block - Internal Frame Block - Corner Block
The main blocks I had no issues with and they came together easily.  There do seem to be instruction errors though for both the internal and corner blocks.  If you are going to make this project, look at the pictures and work out your own formulas and there should be no problems.  Here is what I found......

INTERNAL FRAME
There are several units to the internal frame block which, when made up, needs to measure 5" square.  If you follow the instructions in the book you won't get this final measurement, you'll get a bit of a mess.  However, if you make the 4 patches as per instructions, then adjust the other units to fit, you'll be fine.  Let me clarify........

The 4 patch units need to be sewn to a plain piece.  The instructions suggest cutting the plain units 3" x 3 1/2".  If you do that, you'll get this....
Oops!

Next, you need to make the little centre strip.  The instructions suggest you cut the middle strip 1" wide and the 2 side strips at 3" each and sew them together....

Uh oh - this piece is 6" wide - I don't think it's gonna fit!

LOL
But an easy fix to get your 5" block.

CORNER BLOCKS
It's off to a good start but then the wheels fall off.  The instructions ask you to cut a 1" wide strip x 4" long and sew to each side of the centre unit.  Cutting the side strip 1 1/2 " wide  and 3" long would work better. 

3" square centre unit


To the bottom of this unit the instructions say to cut a dark strip 4 1/4 inches long and attach 2 x 1 1/2" coloured squares to each end.  Um  I see a problem here.......
Whoops
A 3" strip would work much better.......... :)

I've notified Harriet and Carrie about the issues I had with this project but I've not yet heard back.  The errors could be a misunderstanding on my part and I'll leave it at that until Harriet has had a chance to take a look at it.  In the meantime, I suggest you look at the illustrations before cutting all of your fabrics as they are the best clue on how the blocks fit together.  I made a couple of 'test' blocks before making the rest which proved to be an excellent idea!  Anyway, even if you do cut incorrectly, they are easily fixed as they tend to be cut too large rather than too small.

BORDERS
This quilt has 2 borders added on - a narrow coloured on and a plain wide one.  Very effective, very nice.  Adding the first border is interesting as you have those angled corners to deal with.  Working from pictures of Harriet's quilt in the book it's not that hard to figure out how to do it (and thanks to Ali for her advice as well).

Leave long tails on the ends of the border...........
add a piece across the corner........
sew and press.......ta da!
Add the corner triangle and trim square

At this point I knew I didn't want to have simple plain black borders, I wanted something more interesting.  I played with the idea of adding prairie points and found a technique by Rami Kim which made continuous prairie points.

I made one small strip, decided I liked the way it curved and mentally added this to the border.  I then pulled out the scraps - the test blocks and left over strips and had a play with them.  This is the result...

The outer borders are different widths and a bit more interesting. 
I've re-named it "The not so nice quilt"


The prairie point band isn't stitched down, so I can quit around and under it.  I may leave it as it is or attach it down, I've not decided yet.

The quilting for this will have to wait, as it seems no one in Hobart stocks black batting anymore.  I've had to mail order from overseas and it'll be a bit of a wait.