Quilter's Academy - Volume 2 - Sophomore Year

Vol 3 - Junior Year


Monday, August 30, 2010

Vol 2 - Project 4 - Irish Garden (Milly's Quilt) - Quilting

After prepping this quilt I spend a couple of frustrating hours trying to get my quilting brain to kick in.  It just wasn't happening, the butterflies weren't working and I gave up.  Instead I distracted myself with a couple of NHP's (Non Harriet Projects) I've been working on.  These are a hexagon top I'm making by hand (don't all beginners make a hexy quilt?) and a crazy quilt which is loads of fun, allowing me to be more creative, a sometimes necessary change from all the precision and rules of the book quilts and I'm having an excellent time using non-cotton fabrics and pictures in my blocks.

Anyway - Milly's Quilt.  The call came Friday night that baby was on the way, (over a week early of course) so I spent a panicked Saturday furiously working at getting this quilt finished.  I'd chosen a plain-ish backing and I couldn't resist marking and quilting from the back, the front of the quilt having such busy fabrics.

Besides, the squares made by the ditch stitching was too hard to resist - so much easier to see!

The marking was finished by lunch-time (a record for me I think) and the quilting begun.  I'm still having trouble controlling stitch length, but this time around at least my brain kicked into quilting mode after a bit of a warm up.

The quilting is really hard to see from the front - honestly, I don't know why I bother, with such busy fabrics perhaps it's better to just concentrate on texture rather than design for the quilting.


Personally, I think the quilt looks better from the back - pretty pink polka dots and the quilting can be seen.


By 5.30 in the afternoon, it was all done and the binding started.  On Sunday the binding was finished and the quilt washed and drying on the table.  Whew!  Amelia Jayne was finally born late on Sunday night, a healthy 8lbs ?? (details are sketchy - Mum was tired)!  My first granddaughter!

I'm off to the mainland on Wed to say hello to Milly and give the new mum a hand.  It would have been nice to have Bryce's quilt finished as well, but I'm not going to try.  Rush jobs are rarely as nice and it's a pity really - the borders on Milly's quilt are rather wonky (by that time I was tired and just wanted to finish).

I'll be gone from the sewing room for a while - it's hand pieced hexy's till I get back to Tasmania.

Sunday, August 22, 2010

Vol 2 - Project 4 - Irish Garden (Milly's Quilt)

This is the alternate version of the previous quilt.  It's the same design, but smaller and the setting triangles are in a contrasting colour.  Here is Carrie Hargrave's version.....


I almost didn't make this one, because it's pretty much identical to the previous one.  As it turned out I'm glad I did as I learned something really important, which I'll explain later.  Also, as this top is quite small and I wanted to use the pink/blue colourway I'd played with on the previous quilt, I thought this may be a nice little quilt to make for my new granddaughter - who is yet to be born!  Amelia (who I promptly nicknamed Milly) is due to be born on September 10 (that's in a couple of weeks) and if she turns out to be a boy, um, I hope he likes pink!  The smaller size will be perfect in a pram or on the floor or to throw over a bouncinette or just to cuddle in.
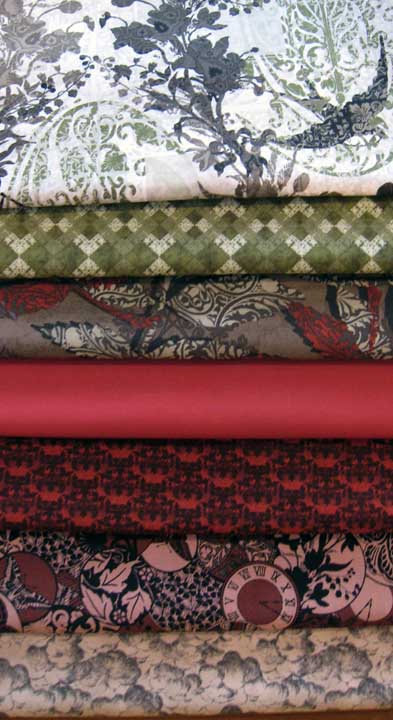
FABRICS
I decided to play safe with the colour choices for this top, using a selection of coordinated fabrics from the one range - Chelsea Lace from Studio E - plus I added a white waffle weave cotton.

Ok, so it's not your average fabric selection for a baby quilt, but I don't have pink girly fabrics in my stash and I really love this design.  Yes it has lots of black but it does have butterflies and flowers (of sorts).  Hmmm......so when she's older I'll  make her a girly type one, with fairies or ballerinas, but for now, its pink and black Nouveau.

LEARNING A THING OR TWO
There are no separate instructions for this quilt so you need to count the blocks and make the fabric adjustments yourself.  For some reason I made just the right amount of rail fence blocks but made too many nine patches.....had a senior moment I guess.

Note to self - when making nine patches, use solids, tonals or tiny repeat prints.  Yes, I did it again - made the quilt top too busy looking by using the large print in the nine patch blocks.  Sigh. 

Pretty fabric in a large piece, but looks very different in 1 inch squares!

Originally I made the top square, as per the instructions, but decided to make it longer (using up those extra nine patches), thinking a rectangular quilt will be more practical than a square one.

Square layout

Rectangle layout

As I was stitching the rows together, I discovered something interesting............ check this out.

That triangle doesn't fit.   I unpicked, re-stitched and bingo........ all nice and as it should be.

The triangle was the correct size but must have been turned wrong.  As I was sorting out this little problem, I realised, with much embarrassment, that the previous 2 quilts both have the side setting triangle turned the wrong way. 

Now I thought there was something 'not quite right' with these quilts when I went to trim them up for the borders, but couldn't figure out what it was.  Basically, there was nothing to trim, the points from the blocks almost touched the edge of the row of triangles.  Not explained well, but a picture speaks etc etc.....

This is at the layout stage, and I hadn't twigged that something was wrong.

There's no border on Bryce's quilt but I had a hard time trying to trim the edges without removing the points of the blocks.

And again - the triangles only just fit.  As it's the same as the last one, I simply thought that's how it's done.

Metro Main Street had borders , but as there was no seam allowance  I had to sew over the points.

So this time, I was able to trim using the method from the book - measuring from the point, drawing a trimming line then slicing a nice neat edge.  All was well until I got to the corner triangles. 
Trimming the triangles

It's lucky I wanted to trim the edges to the exact size of the corners (otherwise there could've been tears!)

Don't you think these look a tad too small? I'm pretty sure they've been cut according to the size in the instructions but .....????? I had the same problem with the previous quilts. Maybe with the next one I'll be able to sort out what I'm doing wrong here.  Harriet?

FINISHING
I added 2 borders, but nearly stopped at one.  I really liked the look of the narrow blue/black border - it framed the top nicely. 

But there was still the problematic fabric in the nine patches - I needed to use the same fabric in the border simply to make sense of it all.

All finished.  I'm planning to quilt it with butterflies of course!

Now that I mention quilting, I think it's time to quilt up all the tops so far.  Apart from this one, they're all sandwiched, ditch stitched, and ready to go - except for the marking.  As I'll be using stencils, I'll ponce them as I quilt.


Sunday, August 15, 2010

Vol 2 - Project 3 - Metro Main Street

The next quilt in the book is a small square quilt named Metro Main Street.  Here is the version from the book.


COLOUR
I must have spent at least 3 days playing with colour and fabrics for this quilt.  Of course after all that, I got it wrong.  First I did some colouring in to find the colourway I wanted.  My first thought was for red/black, then I played with pink/blue/black, then tried orange/gold/black to see how it looked.


I was quite taken with the red/black, and started playing with fabrics, throwing in green & cream........before suddenly changing my mind completely, going for orange/black instead.


Decisions, decisions, decisions!

The quilt is made of only 2 blocks - a nine patch and fence post rails.  The fence post rails would have black in the centre, with 3 shades of orange (rust,orange,gold).  The nine patch blocks have 3 fabrics - centre, cross & background.

I tried a couple of different options with the nine-patch, changing the centres, meanwhile the fence post blocks looked suspiciously like licorice allsorts!  Uh Oh.


All laid out, the licorice allsorts blended into the pattern and looked ok, the nine-patches however, remained a problem.  The side setting triangles were good with no issues in cutting and sewing them.


I had chosen a gradient fabric for the nine-patch 'cross'.  The fabric started brown/rust and graduated to gold - it should have blended beautifully.  It didn't.  The cacophony of colours looks confusing, making the top incoherent and messy.

In hindsight, it would have been better to use the graduated fabric as a border

Here is my completed effort..................

Working with colour is quite a learning curve for me, but as a 'student', I feel it's ok to get it wrong - I learn something with every single project.

DESIGN WALL
As I mentioned in the last post, due to lots of windows and not much wall space, I have to lay my quilt blocks on the floor.  This was not working particularly well - I'd step on the blocks, or run them over with my chair!  With the help of the quilting group ladies, I'd settled on using a roller blind hung over the door or a window.  I could attach batting to it and roll it up out of the way when not in use.

Husband John had a different idea - why not ditch the curtains - which I don't use - instead of buying a roller blind?  Excellent!  I picked up a couple of metres of Wonder Wall, John put grommets through the top and hung it on the curtain rings.  Voila - a design wall! 

Ties back neatly out of the way when not in use.  Nice!

I still need to attach hooks on the bottom, so the 'curtain' hangs straight & taut, but it works very well!

Tuesday, August 3, 2010

Vol 2 - Project 2 - Nine Patch On Point (Bryce's Quilt)

THE DESIGN
From the book

Nine patches, plain squares and setting triangles are the elements of this quilt.  Now I will admit to triangles scaring me - I've heard horrible things like s-t-r-e-t-c-h-i-n-g and being difficult to match points, so I approached this quilt project with trepidation.  Making the Sampler showed us the techniques which are to be used in this simple quilt top.

THE FABRICS
This quilt has been made for another grandson - Bryce - who requested (of all things) that it have dirt bike fabric.  !!!!  Okayyyyy.  After looking around and finding nothing, I lucked out with a fabric listed on E-bay.


Personally, I found the fabric rather uninspiring, so jazzed it up with a deep red with tiny brown stars (avoiding all fabrics with flowers and hints of anything 'girly').  Blue & white are the colours of Bryce's football team so I went with that.  The off-white is a quilters muslin from my stash and the blue is the leftovers from the Sampler.  I actually cut a couple of the blue strips 1/4 inch too narrow (damn)! but instead of grabbing the car keys and heading out for more, I rummaged around in the scrap bin and found some other blues which I shaded in - Jinny Beyer style. 

THE MAKING
The making of this top was without drama.  It went together really quickly and I managed the whole thing without the need for any un-sewing at all.  Happily, I was able to use my flash new Creative Grids ruler and was a little intrigued (and a tad concerned) that the tops of the triangles get cut off.  I figured that was how it was meant to be (see how new and green I am) and went with it.
Probably the biggest issue I had when making this top, was trying to fit it on my ironing table!  The instructions suggest laying out the sewn pieces on a design wall, but as I don't have enough wall space to have one of these, (too many windows, and no, I'm not complaining) I laid it out on the floor.  Harriet's instructions are super clear and I had no problems putting it all together.

Laid out on the floor, ready to sew the rows

One thing which troubled me was the points weren't butting up too well.  I figured out the problem was the fabric guide I'm using, forced me to remove the pins an inch or so before reaching the needle, and I suspect the fabrics shifted slightly before being sewn.  Changing the way I pinned the seams sorted out the problem.

The 'shaded' blue fabrics look pretty funky I think.

THE FINISHED TOP

Even with very ordinary fabric, the on-point design gives it extra punch.  I think Bryce is going to like his quilt.