Quilter's Academy - Volume 2 - Sophomore Year

Vol 3 - Junior Year


Tuesday, February 16, 2010

Project 14 - The Final is Finished!

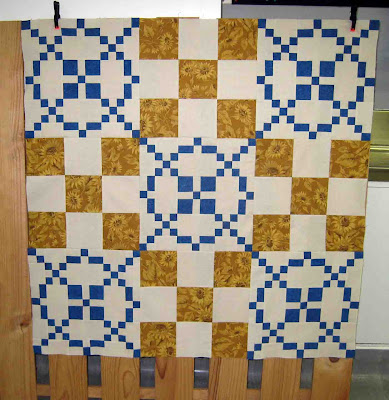
Here it is........................... ta da!

The Final Exam

Just as a reminder, here is Harriet's ......


Looks pretty close -  do you think I passed?


For those who are interested, here's some pics of the process to make the Homespun quilt........


The fabrics used were Blue Jewels from Quilters Choice, Full Sun from Maywood Studios and the horrible fraying quilters muslin again.


The leftovers after constructing the B Blocks - I was one set short and had to cut another strip.  Hopefully I have enough sunflower fabric left for the borders. 
All the fabric calculations were done on a spreadsheet, but I still have to convert imperial measurements to metric - yards to metres, inches to centimeters etc, so maybe this accounted for some of the inaccuracies in my calculations.  Or maybe I just got it wrong and need more practice!


The A blocks were assembled production style, so I made the whole lot at once.  Harriet has a trick of keeping all the bits in order which I took advantage of.

Did you notice the mistake in the completed block at the top?  Yes, I had some unpicking to do!


For the quilting process, I'll be using Heirloom Machine Quilting by Harriet Hargrave as a guide and reference. Everything anyone ever wanted to know about free-motion quilting on a domestic machine is in this book.

A FUN DIVERSION
As mentioned in my previous post, I did a weekend workshop with Lisa Walton, where, with some other members of Stitches & Beyond, we made an art quilt. The process to make the art quilt, was the complete opposite to traditional patchworking - all measurments, including cutting & seam allowances are approximate, there is no seam butting either, in fact no precise-ness at all. This was a really freeing and fun excercise and I'm glad I took part. We spent a lot of time discussing colour and shading, which was brilliant!


Stitching & Beyond members at a Lisa Walton workshop 
(that's me front/left with dark coloured quilt top).

I spent 3 full days on the art quilt, (it's grown a lot since the picture was taken) deliberately neglecting my final exam - does anyone know how to spell procrastination? Now that it's done, I believe I really didn't want to finish it, because that meant I'd come to the end and I'm not ready to stop yet. Yes, there is a heap more to do before the tops become quilts, but I'm going to miss working though the book. I have to wait a whole 3 months before the next one is released in May.

But before I get to that, I'm going to take a little break, re-introduce myself to my neglected husband, and do some other things.  I wonder how long I can stay out of my sewing room? 

Of course I also want to finish the art quilt, make up a new hand applique project, practice some free motion quilting, plan all the borders and quilt designs, shop for fabrics, complete the black & white treadle quilt and work on a challenge quilt for my guild group.  Hmmmm.  Did anyone say obsessed?

I want to thank Harriet and Carrie for their support and encouragement while I've been working on the quilt tops.  Harriet has been in touch and offered help with answering questions and quilting advice, for which I am very grateful and sure to take advantage of.  Not only is Harriet a wonderful teacher, she is also a very gracious lady.

Till next time.................Cheers from me!
Thursday, February 11, 2010

Project 14 - Final continues..........

Just a quickie.  I spent most of the day cutting and making up the various sections of Block A.  They are all now complete and I just have to sew the parts together to make up the blocks.

My fabric calculations weren't spot on, but not too bad either.  I cut the exact amount of inches I figured I needed, then added another 2 inches for truing etc.  I will admit to having extra fabric put away, just in case I got it horribly wrong.

I did have to cut an extra strip of the blue from my 'spare' amount, just to cut an extra square or two - that's really frustrating!

The calico has more extra bits as I got a few of the cuts wrong, then I had to 'borrow' an extra couple of strips from the amount I'd put aside to make Block B.  Sadly, I can't use up the scraps for the B Block, as the strips will be a different size.


The leftovers from cutting all the A Blocks.

I think that having to skill to calculate the fabric you need to make a quilt is invaluable, and it's really not that difficult to learn - even for someone like me, who has very basic maths skills.  Although I got it a bit wrong, I'm happy with the result so far.


Wednesday, February 10, 2010

Project 14 - THE FINAL EXAM

Well I made it this far.  Who would have thought it?  It's time for me to do the final project in the book - the Final Exam.

For this project, there is a picture of a quilt which I need to reproduce. 
No pattern (just a block illustration)
No instructions
No fabric calculations. 

Here is the project, which Harriet has named Homespun.


I did the fabric calculations last night and set about making a sample block today.  In fairness to those who are working through the book and have not yet got to this project, I'm not going to give away too much.  Besides, I'm not all that confident in my ability to get it right.


Here is my sample of Block A.

It's a combined grid block, with familiar units in there - 4 patch, 9 patch and solid squares.  But what is that one in the centre?  We've not come across this one before (naughty Harriet)!  A bit of head-scratching between attempt number one and attempt number 2 and I got it sorted.  Looking at it later I realised what it was - (sometimes my brain hurts) :)

There is no grid size given either, so I figured that I need to work it out from the picture, or simply choose a size I like. Not being particularly brave, I kept the grid the same as what Harriet has used (I think).

I must say that I'm pretty chuffed that I managed to work out how to do the block.  A mere 2 months ago I couldn't sew a 4 patch without directions!

I have a weekend workshop to attend, so won't get much further than this till next week.  Cheers!


Tuesday, February 9, 2010

Project 13 - Scrappy Quilt

I finally got it done.  Phew, this one took a while.  I rather like it - not all the scrap combinations worked out the way I hoped, but most of them look ok.


Next comes all the borders and quilting, but I'm going to cheat and jump to the end.............THE FINAL EXAM - which involves piecing a top with no instructions.

I gotta go study!


Sunday, February 7, 2010

Project 13 - Harriet's Irish Chain Variation Quilt

In the last project, Carrie gave us her version of the Irish Chain pattern.  Here is Harriet's version - a scrappy quilt!


Although this version is an optional alternative to Carrie's, I wanted to do both.  I love the look of scrappy quilts, and I've managed to accumulate quite a few scraps during the previous projects.

First I designed the look I wanted.  I decided to formalise it a bit from totally scrappy to something a bit less random.  I chose 4 colourways - red, green, blue & yellow - then opted to shade the colours & patterns, rather than contrast them.

Picking the fabrics was, as usual for me, a major task which took a couple of days.


I tried to use as many scraps as possible, then went on to small cuts, but in one or two blocks I had to cut into a larger piece to get the shades I wanted. 

For the chain (or B Block) I chose to use a natural quilter's muslin.  I found this to be a bit fine and in hindsight I think I would have been better off with plain old calico, which is a little sturdier, not to say cheaper!

Then came the task of cutting, which also seemed to take forever.  This time, there was no cutting and sewing of long strips.  The scrappy pieces were cut from very short strips yielding only 2 or 4 pieces, to tiny individually cut squares.  It was all very time consuming and I found I needed to be organised to keep all the bits together.


I don't know how many exactly pieces I cut, but enough for 18 blocks.  I made the first couple of blocks one by one.  This is quite labour intensive, but by doing it this way I got to learn the pattern and find the most efficient way to put them together.


Stitching the segments into blocks


Ready to assemble


The first 3 blocks

After these first 3, I started to use a system of chain-stitching.  Miraculously, I managed to keep all the bits in the right order and the right colours.  I had hoped to finish all the scrappy blocks by now, but I still have half a dozen to go before I get onto the chain blocks. 


Scrappy blocks in 4 colourways


Saturday, February 6, 2010

MUCKING ABOUT WITH QUILTING & APPLIQUE

Hello!

There are two essential skills which go hand-in-hand with piecing - quilting & applique, and this week I've had a bit of a go at both.  Lucky for me, Harriet Hargrave has excellent books on both techniques - Heirloom Machine Quilting and Mastering Machine Applique.

Knowing that I have a load of quilting coming up very soon, I've been playing around with designs and ways of transfering them.  My husband made me a light box, which is excellent and makes tracing so much easier.

Remember the very first quilt I made from the QA book?  It was the quilt that grew - it was supposed to be a small panel quilt, but my panels were large and retangular, which required modification to the pattern.  Anyway, as I've decided not to put borders on this top, (it's big enough thank you)  I've gone straight ahead to the quilting design.


The design is a simple one from Harriet's book.  I've practised it a bit but am going to need more before working on the quilt top.  The rest of the top I'll probably just stitch-in-the-ditch.


The pattern reflects the one in the panel (which you can't really see in this pic).

On to Applique

For some reason, I was finding getting started on applique work rather intimidating.  I think it was because of all the different techniques available I was confused and didn't know were to start - so I didn't!

Finally last night, I sat down with a pattern, some freezer paper and a bunch of fabric scraps and set to work.

I found the process rather enjoyable.  It's really fiddly but no where near as difficult as I thought it would be.  Again, I chose a simple pattern from Harriet's book, played around with some colouring-in, then picked up my scissors and got to it.  It took a couple of hours, and the points aren't pretty, but for a very first attempt, I'm rather pleased with the result.


I used freezer paper templates, cut the fabric to 3/16" then pressed it over.  Not a single burn to my fingers either!


Love Tulip

These are still loose pieces, which I've simply laid out.  When I get a chance, I'll set it up on some backgroud fabric and start stitching.

THE NEXT PROJECT

I haven't completely neglected the next projct in the QA series, I just haven't progressed very far yet.  I've only made 3 blocks, which is slow going as it's a more labour intensive design.  I'm hoping to have half the blocks done tomorrow and can start putting up some pics. 

Till then
Cheers


Tuesday, February 2, 2010

Project 12 - Carrie's Double Irish Chain Baby Quilt

I see a lot of double irish chain quilts as I look over quilting websites - it seems to be a very popular design.

Here is Carrie's very pretty baby quilt version


THE DESIGN STAGE

I spent a coule of days doing mock-ups for this design.  At first I had pastels in mind, but then switched to a more colourful option, thinking this quilt could go to one of my young grandsons.


My first option I loved - it had great swirls of colour, in yellow, red & blue (Superman anyone)?  I knew instantly it wouldn't work as the design was indisernable amongst the mass of colour.  You can see this from the black & white mock-up, also the values were showing up as too similar.


I took out a deep blue print and substituted it with a lighter blue tone-on-tone.  Here is my final selection

I felt that laying the red 'on top' of the light blue, would enhance the pattern.  Nice idea, but it didn't quite work.  In hindsight I think that I should have reversed the placement of the red and blue.


CUTTING THE STRIPS
If you are working through the book, make sure you've done the previous exercise 'Working through the Double Irish Chain Baby Quilt'.  It's important you do this before cutting the strips for this project.  Yes, there is another glitch in the instructions, but you can work this out yourself when you do the maths. 

Alternately, follow the link to Harriet & Carrie's Quilter's Academy Journal - a blog where they post instruction alterations, amongst other things.  Their blog can be found here - http://quiltersacademy.blogspot.com/2010/01/volume-1-errata-found-so-far.html

THE BLOCKS

There are 2 block styles to make for the double irish chain design.  Block A has 5 strip sets using all 5 fabrics in different combinations.

This is strip set #3

I needed to make 18 Block A's.  I will admit to getting lazy with this top.  After a doing a lot of lifting over the weekend, I started Sunday with a sore back.  As measuring and trimming requires a lot of bending over (my table is a tad too low), I skipped doing most of this.  The results show and I'm kicking myself for taking shortcuts.  This is a stunning design with lovely fabrics and worth the effort to do it correctly.  As punishment for my laziness, I ended up with wonky blocks and imperfectly butted seams.


Block A

Block B requires only 2 fabrics and 3 strip sets, which are both combined grids.  The strip sets are then assembled into the blocks.


Assembling Block B

THE FINISHED TOP

Here is my version of the double irish chain quilt - I'm hoping a little boy will eventually enjoy snuggling down into this 'blankie'. 


I specifically chose these fabric colours as I want to combine them with a fantastic Circus print for the border and backing.  This will make it a sort of double-sided quilt.  It's bright, colourful and has lots of little pictures to look at while snuggling (and won't show the dirt as much as a pretty pastel version).


The red, yellow and border fabrics are from The Circus collection by Benartex and the blue is From The Attic by Andover Fabrics

COMING UP

The next project is an alternate version of the Double Irish Chain design, with a completely different look.  Now where did I put my scrap bag?

After that I will be taking The Final Exam (a quilt without instructions, which tests everything learned from the lessons in the book).  Wish me luck!


Cheers

PS - Thank you to Harriet for the tips on pressing.  Harriet suggested my problems with bendy strips could be to do with how my ironing station is set up.  And guess what?  She was right!  I had too much padding on my ironing table, making it soft and spongy, ultimately distorting whatever I ironed. 

You can read Harriet's comment under Carrie's Inlaid Tile Table Runner - http://patchnblock.blogspot.com/2010/01/carries-inlaid-tile-table-runner_29.html#comments