Quilter's Academy - Volume 2 - Sophomore Year

Vol 3 - Junior Year


Tuesday, August 9, 2011

Vol 2 - Project 8 - Five Patch Chain - Quilting

A BIG THANK YOU
Hi everyone.  First I'd like to say thank you to those who continue to support me.  After my brother's death I lost my sewing mojo and struggled a bit to get back into the swing of things.  The support and comments of the readers and followers of my blog have made a huge difference and now I am back with as much enthusiasm as ever.  Hugs to all of you!!

QUILTING - FREE FORM (EEK)!
The Five Patch Chain - or the Red & White Birds quilt as I refer to it is now finished.  This is the one I had all the problems with by accidentally using polyester instead of cotton for the white fabric.  By quilting it rather heavily, I've managed to 'quilt out' a lot of the stretchy seams which plagued this top.


Keeping a promise to myself to get out of the quilting box and do some free-form practice on this quilt - I was surprised at how easy it actually was to do.  Keeping another promise to myself, I also tried silk thread - love, love, love it!  What a shame it's so expensive as it's such a delight to quilt with.  It makes a nice alternative to the invisible nylon I usually use.  I've used a wool batting and free motioned around all the applique first, so the birds puff up nicely

Some piccys of the silk, free form quilted blocks...... I played with simple designs - loops and swirls combined with my usual stipple and echo.
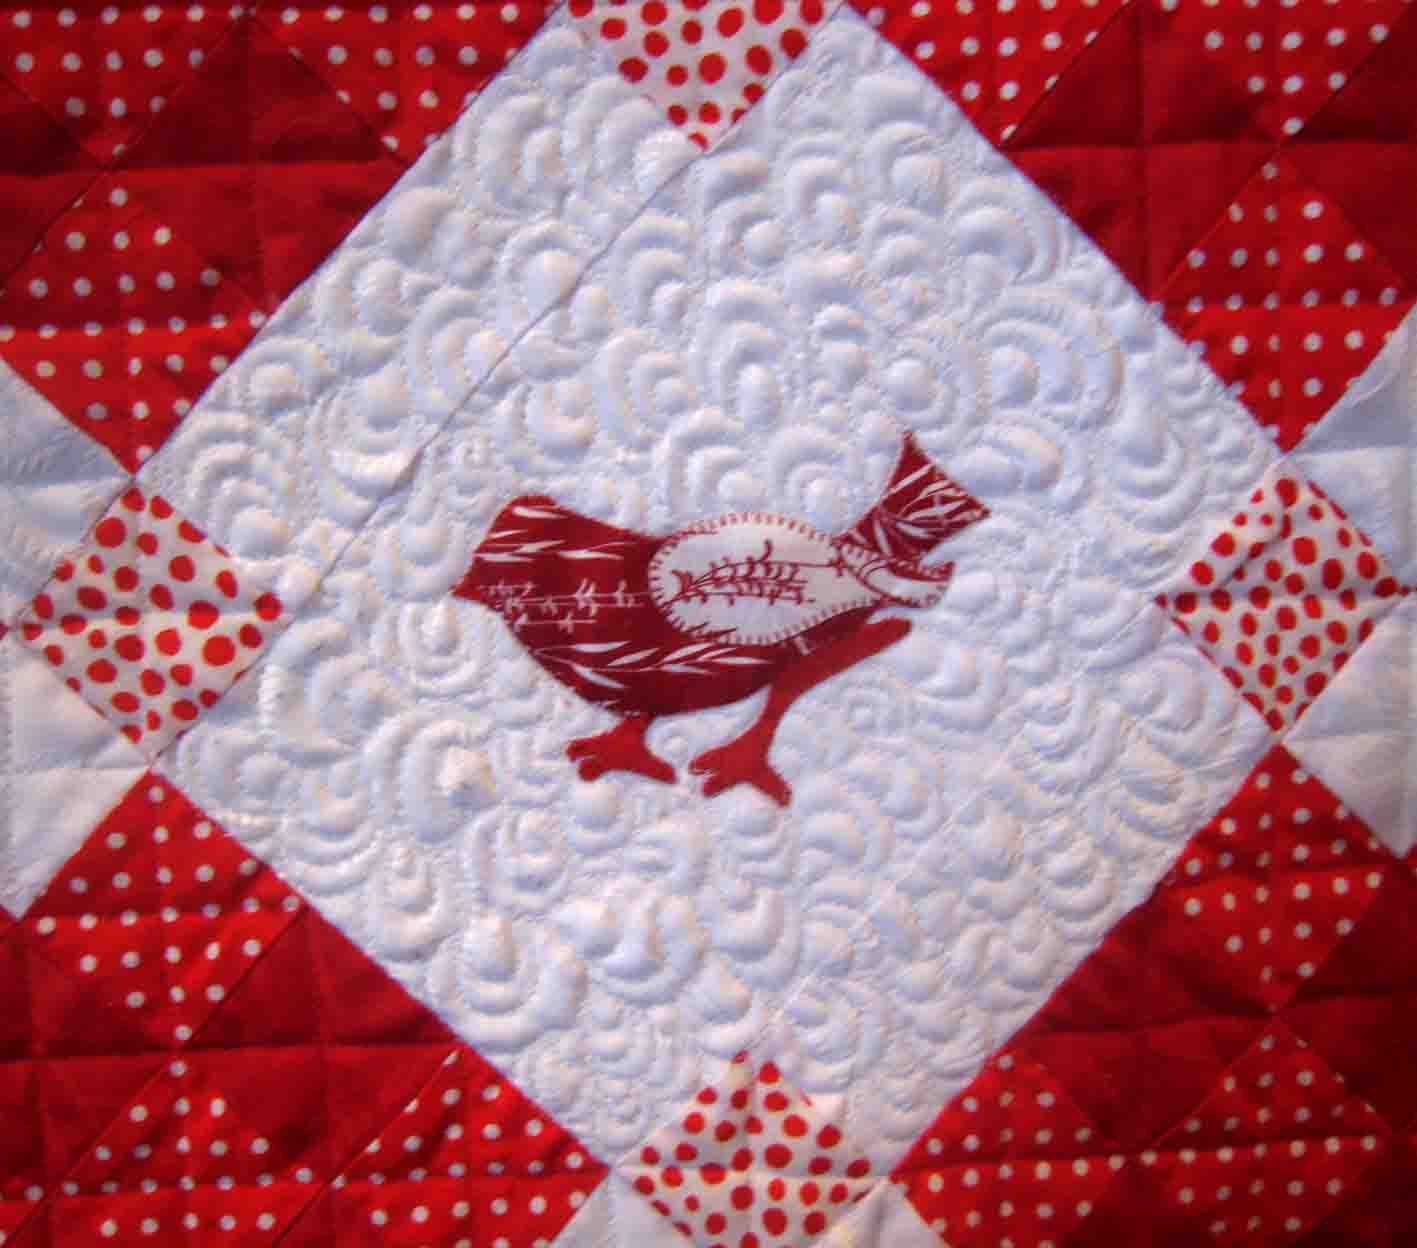
Loops
Swirls
Echo
Stipple
Echo, Swirl, Loop combo

For the side setting triangles, I went back to my comfort zone and used a stencil.
  and swirled the corner triangles..... (oops, missed a bit)!

The rest was simply gridded............ here's half the back.


Overall I'm very pleased with the result of what started out to be a disastrous project.

FIRST WASH - THE SCARY PART
If free form quilting was scary for me, that's nothing compared to putting a red and white quilt in the washing machine.  I have a front loader, so once it's in there's no going back.  I threw in two Colour Catchers and crossed fingers.  The result was interesting.  The Colour Catchers did their job brilliantly, but for one single fabric.  Check this out..........

Before and after washing - one single fabric has run, but confined the pink to itself.  Disappointing, but I can live with it.  I should point out that the misbehaving fabric was a very cheap one - finding red spots on white proved difficult, so I had to go with what was available.  Lesson learned.

You may notice from the full quilt picture at the top, the blackbird has been quilted with red thread instead of white.  I echo quilted it, which looked awful then tried to improve the look with stippling.  That only made it worse.  I hate it but am too lazy to pull it out.

THE NEXT PROJECT

I finished the blocks for the next project, then decided to make it longer so I have another 6 chain blocks to do......... but it's coming along nicely.


I also made this dragon block.  It's designed by Australian quilter Eileen Campbell from her book Medieval Designs for Applique.  It was going to be the centre of a medallion quilt as part of a Round Robin project, where participants add borders to the central design.  Sadly I'll no longer be taking part in this fun project so am not sure what to do with this 20" block.

A BIT OF A BREAK
Ironic that now I have my sewing mojo back, I won't be able to sew for a while.  I'm off travelling, so the current projects will have to wait till I get back.  Meanwhile, I have taught myself to blanket stitch by hand and will take along something to work on while sitting in cars and trains.  Wonder how long that will last, as I'm not really patient enough for hand sewing!


Sunday, July 31, 2011

Vol 2 - Project 9 - Four Patch Chain On Point


This is the next project - a pretty top but no new techniques to learn with this one. This can be made scrappy, as in the picture, or using a single fabric for the blocks and a contrast for the chain.  I've gone for the scrappy option.   The difference with this top compared to previous Irish chain quilts I've made, is this one is set on point so will require side setting triangles

As usual, we start with the smallest unit and build from there.  The technique for making the chain can be a little tedious -well for me anyway, but then I prefer to quilt rather than piece :). 

Step 1 - sew a dozen of these..........

Step 2 - cross-cut them into 336 of these..........
..........then press & measure each one - trim if required

Step 3 - top 'n tail and sew them together to make 168 of these.........

Step 4 - Press, starch and fan the seams...........

Step 5 - measure each one individually and trim to exactly 2.5" square..........
no matter how careful I am with cutting, sewing and pressing - I always need to trim every single one :(

168 four patches - sewn, pressed & trimmed

Step 6 - cut 3 strips of cream fabric and sew the half the four patches to them..........

Step 7 - cut, press, measure & trim to size..........

Step 8 - sew the other half of the four patches to the other side..........

Step 9 - press, measure and trim again - now we have 84 of these..........
Those are the 1 inch 'chains' done.  I've opted to make the linking chain in a slightly darker blue.

Step 10 - Make strips for the linking chain (press, measure & trim) then cross-cut into 42 segments..........

almost there..........

Step 11 - sew two of the sections together - press, measure & trim

Step 12 - Now sew the other half on, a final starch &  press, then measure & trim as required..........
 Yay - the Irish Chain is done!

For the scrappy blocks, I selected brown.  Yup, brown.  

Scraps, skinny 8th's and fat quarters will all contribute to this quilt.  There will be thirty different fabrics and shades of brown.  Most of the browns are reproduction fabrics, so together with the classic cream and blue irish chain, I should end up with a very nice quilt!  

I chose brown because my favourite quilt is this one which I made from QA Vol 1..............
Asian Nights

I use this one all the time -  it has a wool batting and is lovely to snuggle into.  The current project also in brown/cream/blue will be a nice companion for it and hopefully share around the wear & tear.


Tuesday, June 7, 2011

Vol 2 - Project 11 - Ian's Quilt

The quilt is finished, but the binding still needs some hand sewing.


Yes, those are sea turtles .........


They've been appliqued on with raw edge quilting


There is one on the label too

Ian had a special affinity for sea turtles, so I wanted them on his quilt.

He won't get to see them though.  Sadly, my brother passed away yesterday.  I am taking the quilt to his family instead.

Thursday, June 2, 2011

Vol 2 - Project 11 - Harriet's Navajo Dreams - Ian's Quilt

The top is finally finished........... here it is!


Sadly, Harriet's advice (see comments previous post) about not using the square to cut the blocks, but measure the 1/4" seam came a bit too late.  I had to do some creative sewing, but managed to not lose any points.

I auditioned a couple of background fabrics, one was too busy and another too pale.  This one, which reads black from a distance, is actually covered with tiny brown and grey dots.


Not all the fabrics worked well when cut up into 1" squares - particularly those with animals or pictures - it's a bit disconcerting to find a kangaroo with a lizard leg stuck to it's nose!  The fabrics with all over prints or large repeats looked great though.

I'll baste the sandwich tonight and get started on the quilting tomorrow.  I'm going to use the book as a guide here and do all straight stitching as in the example.  It looks great on Harriet's quilt and will be faster to do I think


Sunday, May 29, 2011

Vol 2 - Project 11 - Harriet's Navajo Dreams - MAKING

I've been busy making blocks................

these are some of them....there are more.

This is a very tricky block to make and while I try to be as precise as I can, fabric is a malleable thing - it moves, it stretches, it flops around.  Harriet says that as long as seams finish at a precise 1/4" the block will be square. 

so here is the block with a 1/4" seam marked all the way around.  Those seams look pretty good....

see what happens when a 6 1/2" template is set on top of it.  Those seams are slightly off, and you can see instantly the block isn't square.

I've made 61 blocks so far and the result is the same on every one of them, not one a perfect fit.   Admittedly I've been working rather quickly and getting tired and errors happen when working in haste!  But as a quilter I still have a long way to go.  I decided to cut the blocks square and sacrifice the prettiness of the points hitting the seam line exactly.

So why have I made so many blocks when the quilt only need 30?  I should first explain the reason I bumped this project forward.  I'd earmarked it for my brother Ian - the fabrics are perfect for him.  When he informed me he had a serious illness, everything else went on hold and I immediately got started on this project.  I wanted to make the quilt larger, as it would be of more use as a bed cover than as a throw.

Also, I could get 3 blocks from a half fat quarter, instead of just 2.  An Australian FQ, being cut from a metre of fabric rather than a yard, is a tad larger than an American FQ.

surprisingly that extra little bit allows me a whole extra block

the 3rd blocks from the large Fat Quarter's - and more fabrics!

What I found interesting also, was that I cut my strips 10" long, instead of the 9" suggested in the pattern.  Simply because half an Aust. FQ is 10" and it was just faster to do it that way.  The template barely fits in there.

that 6 1/2" diagonal square only just fits into this 10" block.

I decided to double the size of the quilt and have 2 blocks of 30 different fabrics.  Sadly, the news came that the illness was untreatable and my time frame to finish shrunk dramatically. Even with the blocks made, there are still the triangles to do, not to mention basting, quilting and binding.  The quilt needs to be complete in about 10 days, so when I travel up north to see my brother, I can give it to him personally. 

Now the decision on which blocks to use.  I'll put the rest of the blocks aside and make another quilt with them, when time allows.  The fabric I'd chosen for the side triangles wasn't working for me, so it's back to the shop tomorrow to audition something else. 


Monday, May 23, 2011

Vol 2 - Project 11 - Harriet's Navajo Dreams

I've skipped ahead a little here but don't worry, I'll go back to the 2 projects I've missed when this one is done.


FABRICS
As soon as I saw this quilt, I knew I wanted to make it using Aboriginal fabrics and started collecting fat quarters for it. 

Here's a selection of my collection.  The project requires 15 different fat quarters and I have a few extras as I want to make the quilt larger than the one in the book.  All of these fabrics have been designed by Indigenous Australians and feature the colours of the outback, the foods, wildlife and fauna, the people and the ceremonies they celebrate.

The fabrics are quite busy and some of the repeats are very large, however the colours and the dots/stripes which make up the designs will all work really well together when cut up into smaller pieces.

THE DESIGN
Harriet's been rather clever with this design.  The block is based on a design often known as the Album Block, or Roman Cross and numerous other names.  Normally it's made with templates and tiny triangles, but Harriet has found a way to make it using strip sets.  The good news is that it's much easier to sew strips than to fiddle around with templates, but the bad news is there is a fair amount of waste to get to the finished block.

CUTTING
There are 9 rows and 4 strip sets to make up the block.  The strips are cut into various sizes so to avoid mistakes I bagged them as I cut.


I used a Westalee Ruler to cut the strips.  I really like this ruler when there are lots of different sizes to cut.  The ruler can be set to the desired size, then locked into place so there can be no mistakes! 

Setting the ruler to 2.5 inches, it's then screwed into place.  I then cut all the 2.5" strips, before changing the setting to the next size.  I cut heaps of strips and not a single mistake!

MAKING
As this is my first go at making this block, I decided to make a complete one first to see how it worked.

the nine rows

Sew the strips and cross-cut, then sew the block.  The seams need to be accurate or the block won't work.  Also, the seams are to be pressed open.  This is more time consuming (for me) than pressing to one side.  The book doesn't explain why the seams are pressed open.  It's a mystery!

Seams are pressed open - a little starch on the back helps them lie flat

Once the block is sewn together, it's time to make the magic happen.  In order to make this square block go 'on point' it needs to be trimmed.  That's where sewing accuracy comes into play.  If your 1/4" seams aren't spot on - it's not going to work!

The block ready for trimming

Measure 1/4" from the point and cut!

Those trimmed triangles are now waste.  If I was an art quilter I'd probably find a use for them!

The finished block.

Sadly for me, his block didn't trim to size - it's too small.  Despite taking all care with sewing, pressing, measuring and trimming the strips, I'm about a 1/4" off the correct size.  I'll have another shot, but I'm not quite sure what went wrong.  Up until I cut the waste off, it all seemed to be exactly the right size.  Maybe I'll figure it out with the next attempt.

UFP'S
I've moved rather quickly onto this project, leaving a growing pile of Un-Finished Projects.  I hate that! 

The red & white quilt has been ditched-stitched, and all the nine patches grid-quilted, but all the bird blocks still need quilting.

Krakatoa is still not finished!

The Michele Hill 'Bird' wall hanging still has some free motion quilting to finish (I ran out of thread).

The Tangled Web Quilter's 'Portrait' quilt is still waiting for a binding.

To top it all off, I started yet another NHP - the Alien's quilt for another grandson.  This one is promised for a September birthday, so I wanted to get started on it.

THE ALIENS QUILT
Like the Bug Quilt, this one is also designed by Amy Bradley - Planetary Party


I cut and fused all the aliens onto starry background fabric

I had an idea to applique these with Glow-In-The-Dark thread, just for some extra fun.  When searching for colours, I found this............

Metallic Glow-in-the-Dark

As the background fabric has little metallic stars, I thought this thread was perfect for the project.  I found I could only buy it as a set of 5 different colours.  At $50 a set it was pricey, especially as there's only 100 yards per reel.

I appliqued the first alien with it.  It sews horribly.  I fiddled with tension for ages, but I still got hideous loops in the blanket stitch.  The thread is also wiry, not soft at all.  It feels just awful on a bed quilt.

Loopy, split stitches. 


To top it off, the thread doesn't glow in the dark at all. Not a spark, not even a teeny glow.  The thread on the spool glows, but as a single thread, there is probably not enough of whatever it needs to make the thread fluorescent. The reel says luminous, but the ads say it glows in the dark.  An expensive mistake, I'm going to have to re-do this block.